Tuesday 31 December 2013

Light up my New Year

Hi again...
I wanted to do one last post for 2013. I made this project for me - just me. No agenda, no challenges, just pure fun and creativity for the things I love - paper, lanterns, and Christmas.

I was a lucky girl this December. I got a Silhouette Cameo for my birthday from the sweet man. It has been a bit of a learnig process for me, but I've managed to figure out blade depth, SVG files and the right kind of paper to use for the projects. 

SVGcuts.com is a fantastic online store for 3D paper projects (another passion of mine). 
Here's the project I pieced together...


It stands at about 32 inches tall. I kept the color scheme to white, gold and green to match my Christmas tree.

I created a banner that can be removed to ring in the New Year.

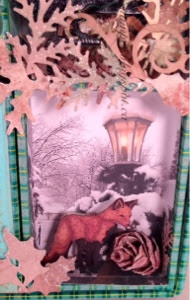
I learned how to weld 2 shapes together (pictured here with the lantern side and swirlies.) i did it wrong though, because I "lost" the score lines so I had to hand score the folds.

I used the flourish embossing folder from Tim Holtz to add texture to the banner.

The base is my favorite because everything is made of paper. The drum, pinecones, greenery - all assembled on Christmas Eve while watching the Dr. Who Christmas specials marathon on TV.

Side view...

Happy New Year everyone, "let's hope it's a good one without any tears." 
SVGcuts.com files used:
Spooky soiree - lantern
3D wintergreens
Santa's Visit - drum
Swirlies

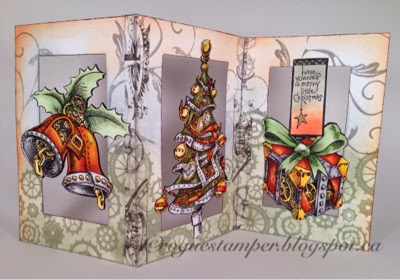
Stamps on the drum: Graphic 45 12 days od Christmas
Numbers on banner: Brenda Walton for Sizzix
Random foliage and picks: Michaels
Recycled cardboard tube for lamp post

Saturday 21 December 2013

Jack Russell Joy

Hi everyone
 I just wanted to post a quick card that I will share with the Simon Says Stamp Monday challenge. 
Stamp out 2013 and the Wednesday challenge "Bling it On"

http://www.simonsaysstampblog.com/mondaychallenge/challenge-stamp-out-2013/
http://www.simonsaysstampblog.com/wednesdaychallenge/simon-says-bling-it-on/

I have 2 Jack Russells and they are my joy. I never thought I could love them as much as I do. They are my fur babies. I found this super cute stamp at Michaels, and I knew it had to come home with me.
I created a splattered/sprayed background using Heidi Swapp's color shine. Using Tim Holtz's holly stencil, I inked in some peeled paint and festive berries distress ink. Then I layered washi tape and glittered tape around the matted image.
I added a tattered banner with the glittered letters. I felt it needed something else, so I created an "ornament" with a circle die cut. It was stamped with the paw print then double embossed with UTEE. The top was cut from the Tim Holtz carved ornaments die.

I colored the Jack to look like my Roxy, using Copics.

Here's Roxy, my model.

And wishing you all peace, love and joy in 2014.  Merry Christmas from me, Laurie "the Rogue Stamper"

12 Tags of 2013 - December

Hello again, I wanted to share another Christmas project with you. Of course the month wouldn't be complete without participating in Tim Holtz's 12 tags. Here's the link:

http://timholtz.com/12-tags-of-2013-december/

I started making a tag, but it is Christmas, so it kinda grew a little bigger. I absolutely love the way the pointsettia turned out. I colored the CFA with Copic markers.

Background is old paper and antique linen DI with a touch of bundled sage on the stamp.

The stacked words are inked and double embossed with UTEE

And because I couldn't stop there (plus I had a lot of good leftovers on my desk) I made another card.


This is a jumbo tag scored and folded to resemble a matchbook. The background colors are peeled paint, brushed pewter and picket fence distress stains.
I colored the silver staples with alcohol markers.
The stencil was inked up with Evergreen Bough. 
My "leftovers" included a tattered banner, some tattered pinecones and a mini pointsettia, oh and some beads I had dyed red with alcohol ink. 
I hope you enjoyed my 2 cards. I'm kinda sad that all the Christmas projects are winding down. I LOVE making Christmas stuff. I hope you have a creative and joyful New Year.

Friday 13 December 2013

Christmas Configurations

Hi again, 
So remember the last blog post, when I mentioned the configurations book and  the card to go with it? Well here was my inspiration, thank you so much Jan Hobbins, you are a creative master.


Alright, so I had most of the supplies in my art room and a few that I changed up at bit, 


Lots of evergreen bough and antique linen distress inks and clear rock candy dry glitter used on this project.


Inside...
Inside cover

I love the way the carollers turned out. I used black distress crackle paint and graphite viva paste over top.
I had an extra picture lying around, so I lined the box with it and added some embellishments. The fox is from Bo Bunny paper.


This picture of Santa and the little boy was another pic I had lying around. Tim Holtz had provided a link to all these great vintage Christmas photos. ( I think it was one of the 12 tags of Christmas 2010?)

The sled is from Bo Bunny, the skis are made from a popsiscle stick. 
I had so much fun making this. It took about a week, but it was soooo worth it. Hope you enjoyed the tour. Merry Christmas everyone! 

Thursday 12 December 2013

12 Days of Christmas Cards - Day 12

On the twelvth day of Christmas my true love of paper gave to me: a trip to the north pole.

Welcome to day 12. Santa's on his way. I was inspired to make a matching card for the configurations book I completed a couple weeks ago. When i saw the project that Sizzix design team member, Jan Hobbins had made with the configurations book, I literally drove straight from work to Urban Scrapbook to see it in person. And oh my gosh, it did not disappoint!

It's so beautiful.

I found the 12x12 paper at Urban as well, but it was in the teal tones instead of red. I was ok with that. 
I cut the paper down to a 5 3/4" square highlighting the north pole map.
Next i die cut the reindeer and sleigh, (Couture Creations) inked it up with evergreen bough distress ink then applied 2 coats of UTEE.

The greenery and pointsettia were a variety of dies and punches. I used the tattered pointsettia embossing folder to add texture to the flower.


Here's a peek at my version of the configurations book. To be continued...

Wednesday 11 December 2013

12 Days of Chistmas Cards - Day 11

On the eleventh day of Christmas my true love of paper gave to me: deers and birch trees.


Memory box dies on tiffany blue cardstock


Inside
I found this great pop up die from Joy Crafts. I cut it out and then used the snowflake on the edge die from Tim Holtz. I added some ink behind the pop up and mounted a sentiment on a frame die cut.

Enjoy, it's my birthday today so I am writing this while getting ready to go for a fancy dinner with good friends, hence the hastiness of this post

Tuesday 10 December 2013

12 Days of Christmas Cards - Day 10

On the tenth day of Christmas my true love of paper gave to me: the tenth doctor in a blue box.

Ok it's no secret that I am a Dr. Who geeky girl. Oh to have a mad man in the TARDIS ask you to go on crazy adventures in time and relative dimention in space (and everyone you meet has a British accent)...sigh, it would have to be the tenth doctor though. Giggle.


TARDIS card layered and snow added for fun.
Photo credit linked back to Sqidoo.com

Here's another wholiday pic


Aaaaaand My TARDIS lantern

Thanks for dropping by today. Alonsy!

Monday 9 December 2013

12 Days of Christmas Cards - Day 9

On the ninth day of Christmas my true love of paper gave to me: a steampunk accordian card.

Hello again, welcome to day 9. I have these great steampunk Christmas images from Make It Crafty.com so I printed them up and did a reverse image as well for all 3. That way, the card is reversible and looks the same on both sides.

I cut a window out of the 4x6 double thick card, decorated the panel with some homemade stamps
(I die cut some gears and a flourish out of fun foam)  then I used tissue tape to tape the panels together.
The images were colored with Shinhan touch and copic markers, cut out and glued back to back. (That's why I needed the reverse image)

I liked the way this one turned out, you've probably noticed over the past few posts that I've made quite a variety of cards, but that's what I like about making my own. You can personalize them so much. Now don't get me wrong, I don't make 25 different cards, I will make a few "in bulk" but for the most part, I really enjoy playing with ALL my different dies and stamps. 


Here's another steampunk card I made with the same images, just a little smaller and the Karen Burniston accordian die

That's all today, thanks for checking in on me.

Sunday 8 December 2013

12 Days of Christmas Cards - Day 8

On the  eighth day of Christmas my true love of paper gave to me: a nativity scene.

I always do a religious themed card at Christmas time. After all "that's what Christmas is all about Charlie Brown."

I found this great die from Taylored Expressions. It's simple and elegant.

I embossed a white card panel with the snow flurries folder (Tim Holtz)
I added a bit of blue ink in a couple different colors to highlight the snowflakes
Then I die cut the Nativity with dark purple cardstock mounted it with foam tape and added an Ideology star. 
That's it, not too complicated at all.


I used the same die to make a lantern. I used black cardstock and antique bronze distress paint.
 There's lots of die cuts decorating the top all in a bronze/brown color tone

Oooooh pretty

Thanks for popping in. See you tomorrow.

Saturday 7 December 2013

12 days of Christmas Cards - Day7

On the seventh day of Christmas, my true love of paper gave to me: 2 Happy Santas and some digi stamps from Make it Crafty.


Pretty self explanitory really. I layered and printed the images on heavy white cardstock and colored it with my Copics and Shinhan Touch markers. 
The coloring took a while, but with coffee and music in hand, I enjoyed the process.

Thanks for looking in, see you tomorrow.

Friday 6 December 2013

12 days of Christmas Cards - day 6

On the sixth day of Christmas, my true love of paper gave me : a six panel card featuring Graphic 45 stamps and paper.


The panels are 4 x 6 inches and taped together with washi tape. So far, I've only done half of the 12 days of Christmas panels because, well, frankly, I got bored. (Hehehehe) but it is day 6 of my posts and I thought it was rather clever to include this one.

I started with double thick white cardstock, stamped and embossed images from Graphic 45.
Next I swirled on various colors of Distress Inks. Once the panels were inked to my liking, I ironed off the embossing powder between some scrap newsprint.  I love this technique, so soft and subtle.
Lastly, I fussy cut images from the 12 Days of Christmas line from Graphic 45 and adhered them with foam tape for dimension.

Thanks for dropping in today, half way there. 
See you tomorrow.

Thursday 5 December 2013

12 days of Christmas Cards - Day 5

On the 5th day of Christmas my true love of paper gave to me - a special card that turned into a 5 hour project.

I have my "Christmas Love" board on Pinterest that is my "go to" for inspiring photos. This card uses one of my favorite pictures that links back to warrengrovegarden.blogspot.ca

I knew I wanted a lot of layers, so I used 6 copies of the picture. I started cutting and layering objects that would be in the foreground until it outgrew itself!  I liked the paper layers, but it looked ridiculous just on a card panel. That's when the 5 hour ordeal came in to play.


I cut a frame and embossed it with the Tim Holtz seasonal borders and inked it up with Iced Spruce. Next I backed the frame with acetate.
Next I had to construct a shadow box of some sort, so I measured and scored and inked and taped and cursed and drank copious amounts of coffee. The picture fit right inside the little box. Then I added  "snow" and finally glued the frame to the top of the box.
To turn it back into a card, I scored and cut a folded piece of cardstock the same size as the frame. The frame and card are about a 1/4 inch bigger than the shadow box.

I hope you liked today's card. I know my friend/coworker did. And a huge thank you to warrngrovegarden.blogspot.ca.  Your pictures are Amazing and inspirational.